Photography Basics
A friend recently asked me to share some basic tips for taking pictures. So, with the help from a mentor, I have come up with several photography basics. These concepts run through my mind every time I snap a photo. They provide for depth, interest, professional outcomes, and attention brought to the subject. I hope that this blog provides a good list of suggestions that help you grow in your own photography journey!
Subjects
Every picture begins with a subject. This is the object which catches your eye, the main character of the story your photo tells, and the thesis of your work. Every good picture begins with a subject. Finding your subject can be accomplished several ways. Do you already know the story you want to tell? Go out looking for a subject which portrays that story well! Or maybe you grab your camera and walk around, having no idea what you want to photograph. Look for things which catch your eye! Otherwise, are you wanting to capture a memory? Photograph things and people that remind you of a particular time. These are only a few examples of how subjects might be chosen.
People make great subjects. No two are alike! Practice using models looking both at and away from the camera.
A consistent pattern or color in the background makes subjects stand out.
Mix textures and angles around your subject for more complexity.
Subjects aren't always obvious. Sometimes they seem faded or a part of the background.
While subjects capture the main idea, other aspects of taking pictures make one subject able to tell thousands of stories. The following sections describe some of these techniques.
Perspective
Just like our personal world view affects how we see the world, perspective influences how a photo will be interpreted. Taking a picture from above or bellow the subject provides two different moods. Additionally, a camera could be positioned in line with a subject or at an angle to it.
Getting down the level of the subject provides a view from that thing's perspective. It helps portray a feeling of being in someone else's or something's shoes.
Many times people fall into the pattern of always taking pictures from the front of things. While this isn't bad, climbing around to the back provides a new perspective which might tell the story you want.
Angle the camera above something, looking down at it. This often creates a mood of observance.
Try angles you wouldn't think of at first. This might create a sort of unbalance or motion which makes the viewer study the picture more.
Looking up towards something might infuse a mood of awe into the picture.
Leading Lines
This is one of my favorite techniques! Leading lines do just what their name implies: they lead up to the subject, directing the viewer's eye towards the main idea. Leading lines can be obvious or subtle. And they aren't always straight! Practice using a variety of things to be your leading lines, bearing in mind that the purpose is to bring attention to the subject.
Use objects surrounding your subject to lead up to it.

Background can also provide leading lines, such as the board at the bottom of this picture.
While this picture has a lot of texture between the rocks, water and sky, the leading line causes the eye to first look at the person. Thus it brings initial attention the subject, making the background more subtle.
Rule of Thirds
Imagine this: each picture you take is divided into six squares by two lines crossing through it vertically and two horizontally. These imaginary lines provide the basis for the rule of thirds. This rule requires the subject to be contained in one of the "boxes", often to the side of the picture, or on a "line" between two "boxes". The subject may also rest in dead center or in the corners.
The subject in this picture is off to the side, on the "line" between two "boxes".
This subject fills the middle box of the picture.
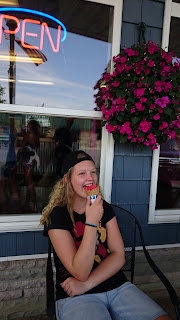
While the subject (the ice cream cone) is utilizing the rule of thirds, the model's body also acts as a leading line.
An example of the rule of thirds on a vertical canvas.
Although often times the rule of thirds is used for a subject against a plain background, it can also be used with a subject amongst other elements in the picture.
The rule of thirds may also be extended to split the picture into three layers, like the popcorn/box/tablecloth above.
Filling The Frame
Filling the frame is a photographer's option if his picture doesn't work with the rule of thirds. When filling the frame, take your picture close up the subject so that it occupies the entire space of the picture.
Two subjects filling the frame. The line between the two colors brings the eye to the middle of the picture.
Filling the frame with faces. I often used this technique when taking pictures of babies.
Sometimes filling the frame requires cutting out a small section or corner of the subject. This brings attention to the heart of the subject and eliminates background, which could potentially distract viewers from the main idea.
Natural Frames
Whether using rule of thirds or filling the frame, natural frames provide a wonderful way to "wrap a bow" around the present: your subject. Natural frames come in many different forms, from windows to the edges of a box to branches to an arch way... etc. Natural frames may surround the entire picture or just the subject.
While this crate doesn't frame the entirety of the picture, it gives separation between the main idea and background elements.
This frame (the bars) surround the middle of the subject (the bush), and make the rest of the bush a secondary element.
Although the crates don't surround all of the corn/maize, it gives a barrier around that central space, causing a viewer's eye to look towards the middle of the frame, and less at the truck or peppers in the background.
Focus
Focusing your camera, as any photographer knows, is crucial to getting a good picture. However, once mastered, focusing on different aspects of the picture creates a variety of possible looks. Practice focusing on several different elements of the photo as you take pictures. Snap one picture with focus on the subject, another with focus on something in the background.
This picture focuses on the sun, making it the subject even though it's behind the weeds. Blurring out the weeds even a little bit provides an astounding and complex work. Also, note that the sun is framed by leaves coming off from the weeds' stems.
Focusing on something falling around the subject, such as leaves, give 3D layers to the photo. (Credits to Grace for taking this picture)
Focus on the subject close up the camera, and make the background blurry. This makes the subject seem more understandable against a non-clear background. It also draws the eye to the main idea.
Light
Light adds so much to a picture, mostly because it can be captured in many different ways! There's good reasoning behind saying photos look best when taken around sunset or sunrise; the light is mellow but certainly present at those times. In the middle of the day, the light is much sharper. During late evening, on the other hand, colors and outlines become less noticeable as light fades. Use light to create the mood you want your picture to have. Also, watch out for shadows when taking your picture! They can create more layers when used correctly, but might distract from the subject if not considered well.
A dark, cloudy background makes the color of the tree stand out.
Using subjects which have bright colors that stand out against the surroundings is a great technique.
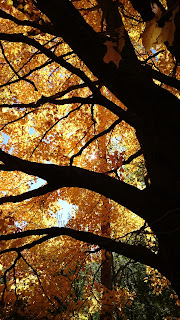
Shadows make a statement in this picture. The dark makes the branches stand out against faded yellow leaves.
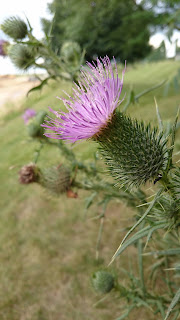
Light in the middle of the day makes colors sharp. Also, the shadow in the petals of the this tulip give the picture more complexity and meaning.
Color
Colors can either stand out or blend together. The colors you choose determine which direction your picture will go in this area.
Bright colors give a sense of energy! Additionally, the darker stripes in this basket stand out, while lighter ones- such as yellow or teal- sort of blend together to make a subtle note.
Practice using a mix of many colors in your picture! In this photo, the color does not define the subject as much as placement does. Coloring proves more a "filling to the cake".
On the other hand, the bright pink of the flowers in this picture makes them stand out against this pastel colored background. After observing the flowers, attention shifts to the door, which contains the next sharpest color in the picture.
Motion
Motion should always be directed towards the center of the picture. When near the edges and facing out of the picture, motion creates a cliff-hanger as the viewer cannot follow its path. However, when motion is pointed towards the center of the picture, there is a sense of completion and fulfillment.


Comments
Post a Comment